29 December 2011

12 Days of DIY - Day 6 & 7 - Safety Pin Necklace and Some Random Jewelry

Day 6: Continuing with my love for safety pin jewelry I developed when I was in Quebec earlier this year, I tried my hand at a safety pin necklace. I think it turned out pretty well.

I think that the dollar store has stopped selling safety pins because finding the last box was quite a challenge. Plus they are all different sizes and it's a bit too long. But I still really like it.

Action Shot!


Day 7: This day, I just tossed together some jewelry after a little adventure to the bead store. I love that place. It's got everything from beads to gold findings to silver jewelry. My heaven. I whipped up these apple earrings using some of the many apple ornaments found around my house.


Litterally. There is a giant bowl filled with them and another vase in the kitchen. 


Here we have the lovely Bow Wowie, named after (Lil') Bow Wow himself modelling these earrings.


They were too short originally but a few more jump rings and they were just the right length.


Doesn't he look darling?

I also whipped up a little robot ring using on of two pendants and ring backings I bought. Each was 75 cents so it only a buck 50. Awwww yeahhhh.


I'll probably buy another one to make a set of earrings.

In the last post I said I'd do something origami, but it has been given me so much grief that I just about threw the paper off the balcony into the freshly fallen snow. I couldn't find the paper I wanted, some paper I tried was too thick, turned my fingers silver, various other stuff... But I still have ideas up my sleeve and plan on completing all twelve days!

22 December 2011

12 Days of DIY - Days 4 & 5 - Cellphone revamp & Glitterized Boots

Like the bottom of my page says: "Glitter is the herpes of craft supplies". So very true. Today's post involves glitter.

Day 4 was pretty basic. My phone was in much need of a back cover overhaul. I never like the last thing I had painted on it but it was fairly permanent so I left it for the last couple of months or so. It took about an hour to scrub everything off. It required a bit of time soaking in a mixture of stain remover and dish soap and a whole lot of scrubbing to get the paint off. Then about 15 q-tips to get the little dots of nail polish removed. My fingers hurt from all the scrubbing but watching Battlestar Galactica eased the pain :)

I settled on something very basic: a glittery blue. Primarily because that particular nail polish only cost me 50 cents and it's super pretty!! I will probably add some more detail later but I like it for now.


The previous phone cover  when first painted - it was horribly scratched before I repainted it:

Day 5 involved more glitter (yay!!). For a while I had wanted to test out DIY glitter shoes that I had seen on many sites (like here and here). While most of those shoes were done with gold glitter I don't wear gold too much. Naturally silver was the next option.


Originally I wanted black glitter but it wouldn't show up when I tried it, unfortunately.


Basically I just combined approximately even parts Modge Podge (mine is matte) and glitter and pasted it on the boots. When it dried I added more, covering up any gaps or spaces. This stuff got everywhere and somehow ended up on my face, as glitter always does. -_-


I think that it looks a little futuristic and spacey, which I'm okay with. I'll leave the silver for now, but I might change it to a dark purple and see how that goes. I've already got some random outfits planned in my head for such dramatic looking shoes.


For some reason, every time I look at them, I think "glitter cowboy books" even though they are not...it's weird...

Safety pins and origami next :)

Happy Hanukkah!

19 December 2011

12 Days of DIY - Day 3 - A Golden Snitch Ornament

The moment  I saw this awesomeness online, I knew I had to try. I've seen all the movies and have only recently started reading the books, but it looked so cool! I have come to learn that my projects will never end up like those that I model them after, but you live and let live.


I originally painted an ornament with a colour called "antique gold" but it didn't look right so I had to go get proper looking gold paint. It still isn't as metalic-y or bronzey as I would like but I don't really want to work on it any more. The wings took forever to get one. A mixture of contact cement and painter's tape was used in end.


I think it kind of looks more like a golden bat than a golden snitch but just picture it whizzing around in the air then it's all good.

Happy Monday!!

17 December 2011

12 Days of DIY - Days 1 & 2 - "Tribal" Necklaces and a Cupcake Fail

Happy Holidays!! I'm attempting to do another 12 days of crafting (leading up to New Years). The general idea is that everyday for 12 days I make a different craft or do something DIY related (like baking or nail art). I'm already behind (shocker) but it's all good.

So to start things off, I decided to try my hand at I Spy DIY's Tribal Necklaces.

Source
Lately I have been falling in love with lots of the different DIYs on her blog and this one seemed relatively easy to do. I am currently not at my regular home so this majority of  my craft stuff is not with me, but embroidery floss is fairly easy to walk with. I used that, combined with a cotton cord from the Dollarama and some gold and silver findings to make a bunch of bracelets and necklaces.


This one took forever because instead of just wrapping the embroidery thread around the cord, I Chinese Staircased it. It was very time consuming.

Once I get silver clasps, I'll finish the set off.


the cord - the basis for the jewelry
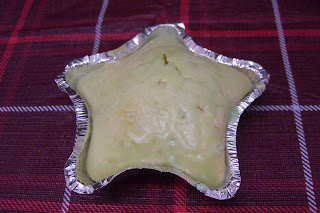
Day 2 involved a whole lot of cupcake fail. I had some tinfoil aluminum star shaped baking thingys and I thought, why not make some yummy treats for me and my mum? Well it turns out that with out a box to bake from, I'm a hopeless fail. I followed some recipe on an australian website that seems to have led me astray. Extremely dense, almost rock like cakes are not particulary tasty.


Oh lordy, can't forget the icing. I attempted multiple times to make some creamy, fluffy, thick icing but it ended up being nothing of the sort. I tried to salvage what ended up being a lemony glaze with green, festive food colouring, but the end result turned out more like moldy looking stars than holiday themed desserts.

there really is green icing - at least it was tasty
From now on Betty Crocker and myself are going to be the best of friends. Harry Potter Fans will like tomorrow's project :)